Wondering how to develop apps for the Apple Watch?
If you’re interested in having someone build an Apple Watch app for you, click here. If you’re interested in learning how to build one yourself, keep reading.
In this article, we will help you create your first Apple Watch app through the WatchKit SDK. We will assume that you come primarily from a design background and are a beginner as far as app development goes. But fear not, we will make this tutorial as simple as possible and explain each step, as we guide you through the process from start-to-finish.
(For more on Apple Watch design and development, check out these key design principles, popular mobile apps reimagined, and prototypes of HealthKit-enabled Watch apps.)

We won’t teach Objective-C or Swift, which is beyond the scope of this article, but rather allow you to observe and follow how an Apple Watch app is created.
Ready? Great, let’s get started.
1. Setting Up Your Environment
The first step is to download a sample iOS project. As you may or may not know, Apple Watch apps need to be paired and bundled with an iPhone app; there’s no way to create a complete standalone Watch app at this stage.
As we are focusing on extending an iPhone app to become an Apple Watch app, we won’t spend time on understanding the iPhone app code — we’ll leave that as an exercise for later on.
We will work through Apple’s sample WatchKit project files, which are available here. The sample project contains both an iPhone and WatchKit component, for your convenience, and will demonstrate a wide array of UI elements available on Apple Watch.
You will need Xcode 6.2, which you can download here. Open the project file in Xcode 6, and you will see the following:

Go ahead and run the project, by first making sure the target at the top shows WatchKit Catalog, then perform ⌘R.

You can now see the project run on your iPhone simulator, but you will get a simple screen, as illustrated below:

We also have a similar simulator for Apple Watch, which we will look at later. For now, we just have a simple iPhone app so we can use it as a vessel for demonstrating our Apple Watch app.
So how does this all work? Well, since we won’t be coding anything from scratch, I will help you navigate the project and explain how all the pieces fit together.
2. iPhone App Component
As I mentioned previously, we need an iPhone app with which to bundle and associate the Apple Watch app, which you would eventually release concurrently. That’s why we have a shell iPhone app.

The iPhone component of this project consists of the Main.storyboard (shown above), which contains just the sample View Controller with the text we saw in the simulator previously. That’s all there is to the iPhone app component.
3. WatchKit Architecture
Going back to understanding the architecture of an Apple Watch app, it consists of two parts: the WatchKit app and WatchKit extension.

So what gets loaded onto the Watch itself is the app, which is just the static resources and storyboard, but no code — nothing that’s compiling at runtime.
WatchKit acts as the conduit that connects to the WatchKit extension, which resides on the iPhone side and contains the code and orchestrates the Watch app interface.
When the user interacts with the Watch interface, WatchKit signals to the paired iPhone and WatchKit extension then creates the objects at runtime needed to manage the appropriate screen the user interacted with.
I’ve given you a brief overview of the architecture, but if you’re interested in learning more about the lifecycle and other aspects, you can dive deeper into Apple’s documentation.
Now we will go through the WatchKit App component, looking at how the static interfaces are wired up.
4. Creating the WatchKit App from an Existing iPhone App
For this tutorial, we won’t need to create the WatchKit app components as they have already been provided for us. But in case you already have an existing iPhone app and want to create the components, we will go through the steps:
Step 1
In Xcode, with your iPhone project open, select File > New > Target and then select Apple Watch.
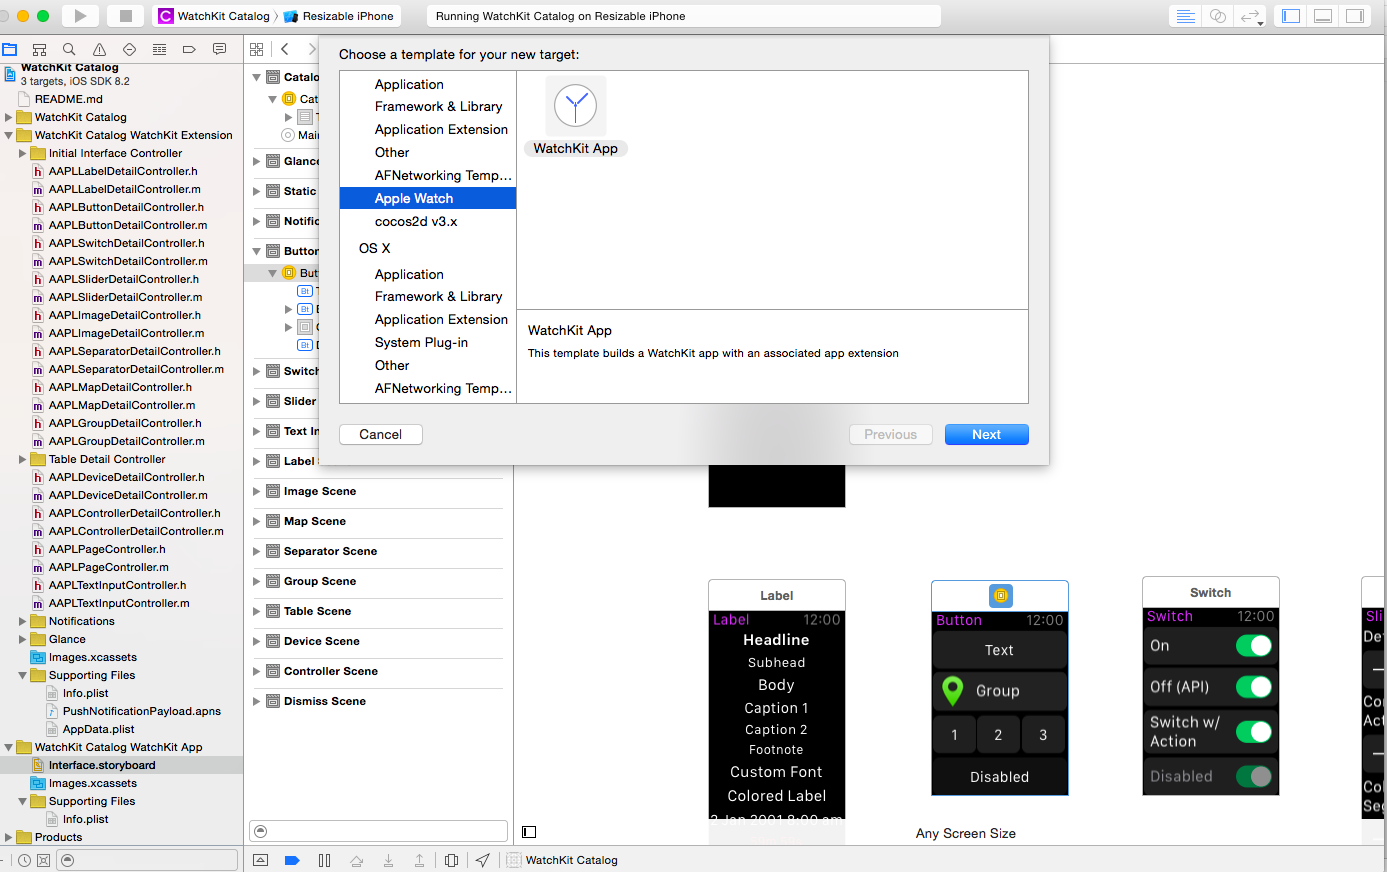
Step 2
You are then presented with a screen allowing you to set the properties of the Watch app. You will also be asked whether you plan on supporting custom notification interface or glance screens (we have that in our sample project).

Understanding how targets work in Xcode is beyond the scope of this article. But suffice to say, you essentially have multiple executables, including an executable target for the iPhone app and an executable target for the Watch extension, plus glance and notifications.
5. WatchKit App Component
Let’s start by opening up the Interface.storyboard file within the WatchKit app folder in Xcode.

Remember, this is the WatchKit App component, and this gets side-loaded onto the Watch. The storyboard we see above contains all of the UI screens we would have on the app. You can explore the various UI elements in the storyboard: select a button or a label, try changing the text, position, etc.

The image above shows the screen elements, where you can interact with, add, update or delete UI elements such as labels and buttons. You can drag in new UI elements into the screen from 3 and change the individual element properties such as label, color, etc. through 2.
6. WatchKit Extension Component
The WatchKit Extension component is the logical part of your Watch app allowing you to compile runtime code, update and set data values, and toggle visual appearances of UI elements, such as changing its alpha setting. Note that you are not able to remove UI objects, so most would simply change the element’s alpha to 0 or toggle the element to hide it, which would then force other objects to fill the void.
In Xcode, in the storyboard you were exploring just now, select the Button view controller, by clicking the top title once. Don’t click on an individual UI element.

On the right, where we have the identity inspector (third icon), we have the Custom Class, which is where we associate a particular scene with a view controller class in our code. In this case, the Button scene is associated with AAPLButtonDetailController.
If you press the little circle with an arrow inside, by the AAPLButtonDetailController text, you will be navigated to the AAPLButtonDetailController.h class file, but you can also reach that file from the left-hand file navigation pane.
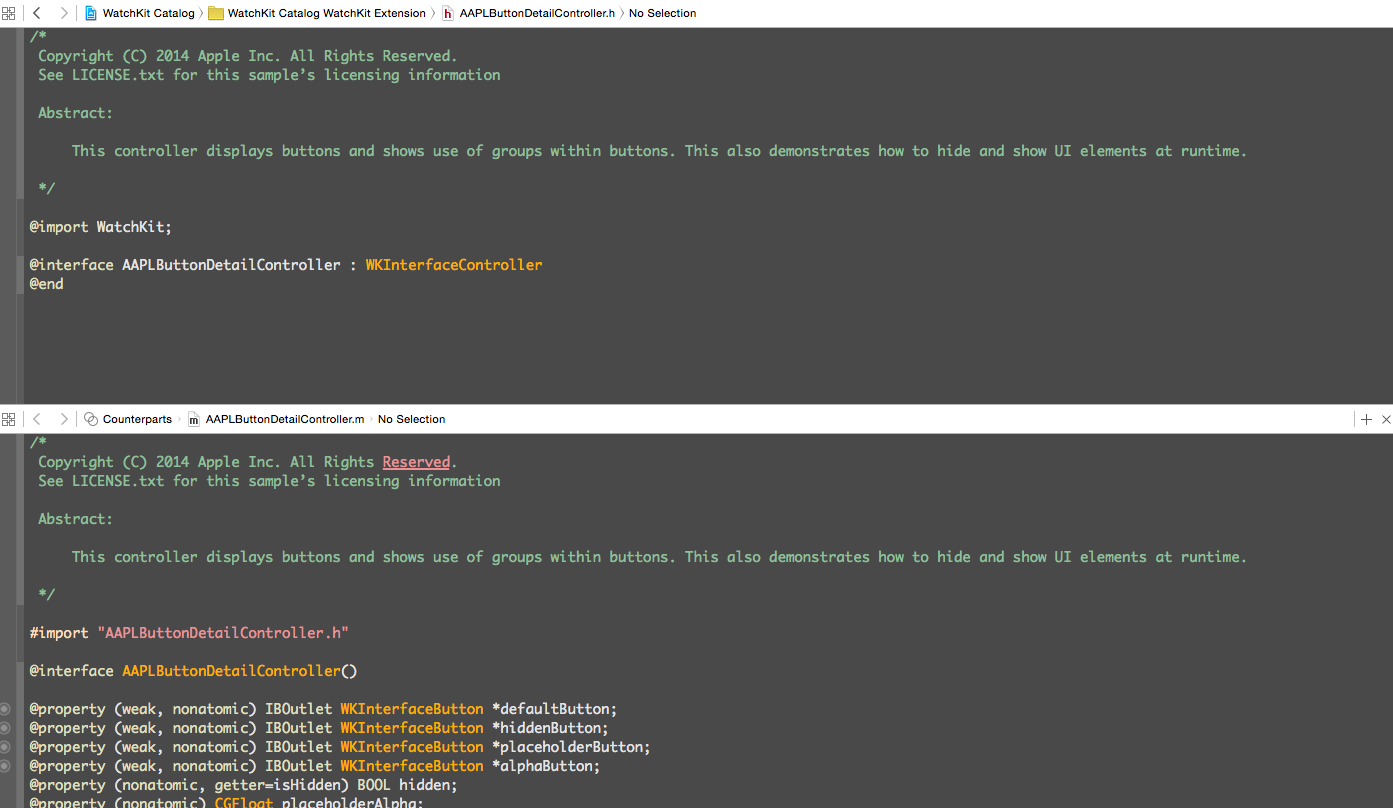
We won’t get into too much more detail with the code, but essentially an Objective-C view controller is composed of a header file (AAPLButtonDetailController.h) and an implementation file (AAPLButtonDetailController.m). The header files generally just expose the intentions of the class, whereas the implementation file is where the meat of the class resides.
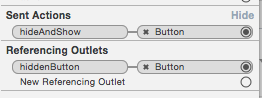
Even without extensive programming experience, by merely observing the implementation class, you can pick up a few things. We have declared some variables such as defaultButton and hiddenButton that are buttons that map to the UI elements we saw in the storyboard. We need to declare and associate any UI elements, such as buttons, if we need to interact with them in-code.
Scrolling down the class we can see various other interesting bits of code that we infer just by their names. Any IBAction methods are functions that react when you select a UI element like a button, and if you further inspected the storyboard element, you can see that method name linked to a button. The hideAndShow method in the code toggles whether to show or hide an element based on its previous state.
Go ahead and explore some of the other classes and how they are associated with the storyboard.
7. Glances and Notifications
A glance is a supplemental way for the user to view important information from your app … A glance should provide immediately relevant information in a timely manner. For example, the glance for a calendar app might show information about the user’s next meeting, while the glance for an airline app might display gate information for an upcoming flight.
So in Xcode, let’s go back to the WatchKit App component interface file and find the Glance Interface Controller scene.

Two noteworthy things to observe in the glance interface scene. First, the image has an outlet pointing to glanceImage, which would be found in the corresponding code class allowing the latter class to access and modify the image at runtime.
Second, as we did before, we can work out what class this storyboard scene is referring to in the Identity Inspector, which happens to be AAPLGlanceController. Once again, selecting the little arrow in the circle will navigate you to that class.
Glancing at the AAPLGlanceController.m implementation class, you can see a method called willActivate, a WKInterfaceController method that gets called whenever glance is about to be activated, allowing you to intercept the flow. In this case, we want to choose an appropriate image to load at runtime, depending on whether we have the larger 42mm Watch screen or smaller 38mm size.
We also make use of Handoff, to pass control to a view controller, called imgeDetailController, along with some meta-information:
// Use Handoff to route the wearer to the image detail controller when the glance is tapped.
[self updateUserActivity:@”com.example.apple-samplecode.WatchKit-Catalog” userInfo:@{
@”controllerName”: @”imageDetailController”,
@”detailInfo”: @”This is some more detailed information to pass.”
}];
We deal with determining whether the screen size of the Apple Watch is the larger one using the following code:
([[WKInterfaceDevice currentDevice] screenBounds].size.width > 136.0)
You get local and remote notifications for free if your iPhone app already supports that, as any notification on your phone will also come to your Apple Watch. You have two types of notifications: a more subtle, abbreviated notification and a long-look notification, if the user decides to further view the notification. You can create customized notifications with custom graphics, content, and branding.
Going back to the storyboard, we find the Static Notification Interface Controller. As with glance, the implementation class takes advantage of the willActivate method, but you also get access to two important protocol methods:
– (void)didReceiveLocalNotification:(UILocalNotification *)localNotification withCompletion:(void (^)(WKUserNotificationInterfaceType))completionHandler
The method above is used when you want to show local notifications and need to use a dynamic interface, or you can fall back to the static notification.

You are also able to handle remote notifications for either static or dynamic interfaces.
– (void)didReceiveRemoteNotification:(NSDictionary *)remoteNotification withCompletion:(void (^)(WKUserNotificationInterfaceType))completionHandler
Running the WatchKit Simulator
OK, enough of all that theory. Let’s run the WatchKit app on our simulator and see how it works in practice.
Change the target at the top from WatchKit Catalog to WatchKit Catalog WatchKit App, then press the play button or ⌘R.

Next Steps
Besides the two targets we played with, you may also have noticed we have two more targets: Glance – WatchKit Catalog WatchKit App and Notification – WatchKit Catalog WatchKit App.
Give those two targets a run, and you can play around with how glances and notifications work. Be sure when you run them to keep your Xcode console in the background, so you can view the log messages Apple has included and see when the willActivate and didActivate as well as willDeactivate functions in the code get called.
